Showing posts with label SQL Server Integration Services. Show all posts

PowerShell script to automate the SSIS Catalog creation

Below PowerShell script will create the SSIS Catalog, if it is not already there.

 # Create a connection to the server

$SqlConnection = New-Object System.Data.SqlClient.SqlConnection

$SqlConnection.ConnectionString = "Server=.;Database=master;Integrated Security=True"

$SqlCmd = New-Object System.Data.SqlClient.SqlCommand

# Enable CLR

$SqlCmd.CommandText = $("exec sp_configure 'Clr enabled', 1
reconfigure ")

$SqlCmd.Connection = $SqlConnection

$SqlConnection.Open()

$SqlCmd.ExecuteScalar()


# Check SSISDB is exists

$SqlCmdDB = New-Object System.Data.SqlClient.SqlCommand

$SqlCmdDB.CommandText = $("SELECT ISNULL(DB_ID('SSISDB'),0)")

$SqlCmdDB.Connection = $SqlConnection

$DB_ID = $SqlCmdDB.ExecuteScalar()

# Create the SSISDB if it not exists

IF($DB_ID -eq 0)
{

# Load the IntegrationServices Assembly
[Reflection.Assembly]::LoadWithPartialName("Microsoft.SqlServer.Management.IntegrationServices")

# Store the IntegrationServices Assembly namespace to avoid typing it every time
$ISNamespace = "Microsoft.SqlServer.Management.IntegrationServices"

# Create the Integration Services object
$integrationServices = New-Object $ISNamespace".IntegrationServices" $SqlConnection

# Provision a new SSIS Catalog
$catalog = New-Object $ISNamespace".Catalog" ($integrationServices, "SSISDB", "YourPassword")

$catalog.Create()

}

$SqlConnection.Close()

Converting string value with "dd-MMM-yy hh.mm.ss.nnnnnn a" format to DateTime in SSIS

I had a requirement to convert a string value which contains a date time value with the format as "dd-MMM-yy hh.mm.ss.nnnnnn a" to DateTime.
I initially tried to convert it with the millisecond value, but it throws an error.
For my requirement I do not need the milliseconds, therefore I tried to convert it by removing the milliseconds part and it worked.

Below is the Expression used in the Derived Column component

ISNULL(DATA_VALUE) || LTRIM(RTRIM(DATA_VALUE)) == "" ? NULL(DT_DBTIMESTAMP) : (DT_DBTIMESTAMP)((DT_WSTR,10)((DT_DBDATE)SUBSTRING(DATA_VALUE,1,9)) + (DT_WSTR,1)" " + REPLACE(SUBSTRING(DATA_VALUE,27,2) == "AM" ? (DT_WSTR,12)SUBSTRING(DATA_VALUE,11,8) : (DT_WSTR,2)((DT_I4)SUBSTRING(DATA_VALUE,11,2) + 12) + (DT_WSTR,10)SUBSTRING(DATA_VALUE,13,6),".",":"))

Hope this will be helpful.

Stop running SSIS Script Task after some time...

There is a SSIS Script Task which use to run another program. But due to the errors in the other program, some times script task is in the running state and it will not get stop.
Since I know the maximum duration which takes to complete the other program, I wanted to stop that script task if it exceeds the maximum duration.

For that I followed the below approach
- For the Script Task added a Timer to track the duration of the execution
- Timer interval is set for the  maximum duration
- When the timer is elapsed, there should be a way to stop the running process of the Script Task
- For that ThreadPool is used to execute the process and CancellationTokenSource is used to cancel the running process.

Code inside the script task is as below


System.Timers.Timer timer = null;

// Create the token source.
CancellationTokenSource cts = new CancellationTokenSource();

bool IsExecuted = false;
bool IsStopped = false;
public void Main()
{
        try
        {
                double maximumDuration = Convert.ToDouble(Dts.Variables["$Package::MaximunDuration"].Value.ToString());
                
                timer = new System.Timers.Timer(maximumDuration);
                timer.Elapsed += new System.Timers.ElapsedEventHandler(timer_Elapsed);
                timer.Enabled = true;
                
                ThreadPool.QueueUserWorkItem(new WaitCallback(ExecuteProcess), cts.Token);
                while(IsExecuted== false && IsStopped==false)
                {
                    Thread.Sleep(2500);
                }

            }

            catch(Exception ex)
            {
                Dts.TaskResult = (int)ScriptResults.Failure;
            }
        }

        void ExecuteProcess(object obj)
        {
            ****Code for the ExcuteProcess****

            IsExecuted = true;
            Dts.TaskResult = (int)ScriptResults.Success;
        }
        void timer_Elapsed(object sender, System.Timers.ElapsedEventArgs e)
        {
            Dts.TaskResult = (int)ScriptResults.Failure;
            IsStopped = true;
            timer.Stop();
            timer.Dispose();
            cts.Cancel();
            Thread.Sleep(2500);
            cts.Dispose();
        
        }
}

Hope this will be helpful...

Automating Excel Report Refresh...

The requirement is to refresh an Excel file in the SQL Report Server by running the Macro in the Excel file.
In this post, I'll summarize the approach and the issues faced and in another post, I'll explain the final implementation.

The key areas of the implementation is
1. Download the Excel file from Report Server
2. Run the Macro to refresh the Excel file and Save the file
3. Upload the Excel file to Report Server

For the implementation, SQL Server Integration Service is used.
If I summarize the approach followed for each steps
1. Download the Excel file using the DownloadFile method in WebClient.
2. Run the Macro using Excel COM Objects
3. Upload the Excel file to Report Server using Report Server Web Service

For 1st and 3rd steps, I could not find any resource directly for Excel files in Report Server, but I was able to achieve it by applying the relevant property values for the Excel files.
To run the Macro (2nd step), initially I used the Microsoft.Office.Interop.Excel namespace using C#, inside a SSIS Script Task. But I faced an issue while focusing on the production deployment. Because for Interop libraries, Excel needs to be installed on the running computer. That means in the Production server where the package is deployed, needs to have Excel installed.
But in the production servers it is not recommend to install Excel due to security reasons. Therefore I have to find an alternative approach.

Due to that initial approach was changed little bit.
Since the Excel needs to be installed on the computer where we run the Macro, we configured a separate VM with Excel installed. Actually this approach reduced any security risk which may occur due to the configuration changes, which will be described later.

Then to run the Macro, if I try to use Microsoft.Office.Interop.Excel namespace using C#, inside a SSIS Script Task, that means I have to deploy the package in the VM, where Excel is installed.
But that will add an additional cost since we have to install SSIS on the VM.

Due to that I choose to use PowerShell Command to run the Macro inside the Excel file, since it is possible to run a PowerShell command on a remote machine. To download the Excel files to the VM, a shared folder is created as well.
PowerShell command is executed from the Database Server, on the configured VM using the PowerShell Remoting. For this PowerShell Remoting needs to be enabled on the VM as well.

PowerShell Remoting can be configured using the below PowerShell command
Enable-PSRemoting -Force

Reference: https://www.howtogeek.com/117192/how-to-run-powershell-commands-on-remote-computers/

PowerShell command on the remote computer can be executed using inovke-command, and you have to provide the relevant credentials as well.
The provided user needs to have Administrator privileges on the remote computer to run the PowerShell command remotely.
But there are ways that we can skip this condition, but it is not recommended to do that due to security reasons.
The complete PowerShell command for Excel Macro execution is as below:

$Username = 'EnterUserName'
$Password = 'EnterPassword'
$pass = ConvertTo-SecureString -AsPlainText $Password -Force
$Cred = New-Object System.Management.Automation.PSCredential -ArgumentList $Username,$pass
invoke-command -computername VMExcel -ScriptBlock {$excel = new-object -comobject excel.application
                                    $filePath = "\\VMExcel\ExcelFiles\ExcelReport.xlsm"
                                    $workbook = $excel.Workbooks.Open($filePath)
                                    $worksheet = $workbook.worksheets.item(1)
                                    $excel.Run("ExcelReport.xlsm!MacroName")
                                    $workbook.save()
                                    $workbook.close()
                                    $excel.quit()
} -credential $Cred

But when I tried to execute the above command from the Database server using PowerShell, I got the below error message

Retrieving the COM class factory for component with CLSID {00024500-0000-0000-C000-000000000046} failed due to the
following error: 80080005 Server execution failed (Exception from HRESULT: 0x80080005 (CO_E_SERVER_EXEC_FAILURE))

If you google this error, you will find most of the people responded saying that automating Excel refresh cannot be achieved, due to the way Microsoft Office is designed.

Reference:
https://social.technet.microsoft.com/Forums/lync/en-US/4ea691e1-fb3e-41dc-887a-0e90f7d1c38d/accessing-excel-com-interop-dll-inside-a-new-cmdlet-code-resulting-in-exception-esp-when-cmdlet?forum=winserverpowershell

But I found some posts regarding some work around for the above error.
Based on those I applied the below changes.

1. Configuration changes to be done to allow access for the COM Object access.
  • Open the 32 bit Component Services on the VM using the mmc comexp.msc /32 in the run start bar
  • Expand till get the My Computer (Component Services -> Computers -> My Computer) and Right click on it to get the Properties.
  • Under COM Security tab, in the Access Permission section, click on Edit Default.
  • Please make sure Running user or VM Administrator Group has the Local and Remote Access.
  • Do the same for Launch and Activation Permissions
  • Click Ok to apply the changes made

2. Change the Identity of Microsoft Excel Application, from Launching User to Interactive User
  • Expand the DCOM Config in the Component Service which was opened before.
  • Go to the Microsoft Excel Application, right click on it and select Properties
  • Go to the Identity tab and select The interactive user
  • Click Ok to apply those changes
Reference: http://www.timwappat.info/post/2013/09/03/Solution-to-Excel-Automation-VBNETC-error-running-as-a-service-0x800A03EC-MicrosoftOfficeInteropExcelWorkbooksOpen

Then the last thing is to enable Auto Logon for the user who is running the PowerShell command on the VM.
The reason that the auto logon needs to be enable is, since the Excel application Identity mode is Interactive User, that user needs be log in to the VM, for the PowerShell command to be executed successfully.

To enable Auto Logon on the VM, I applied the required steps in the below link
https://superuser.com/questions/28647/how-do-i-enable-automatic-logon-in-windows-7-when-im-on-a-domain


  • Type regedit in Start Search and hit Enter
  • Navigate to the following registry key:
    HKEY_LOCAL_MACHINE\SOFTWARE\Microsoft\Windows NT\CurrentVersion\Winlogon
  • Double-click the AutoAdminLogon entry, type 1 in the Value Data box, and then click OK.
  • If there is no AutoAdminLogon entry, create a new String Value (REG_SZ) with AutoAdminLogon as the value name and type 1 in the Value Data box, and then click OK.
  • Then need configure Windows to remember the password for logging in.
  • In the run box, type control userpasswords2 
  • Ensure your domain username is in the list, if not, add it. 
  • Untick (or tick and untick): Users must enter a user name and password to use this computer.
  • Make sure your username is selected. Click Apply.
  • At this point, Windows should prompt for the password that will be used.
  • Then go back to HKEY_LOCAL_MACHINE\SOFTWARE\Microsoft\Windows NT\CurrentVersion\Winlogon 
  • Ensure the following String Values are set, if not, set them:
    DefaultUserName: Your domain username (without the domain prefix)
    DefaultDomainName: Your domain

That is it.

In my next post, I'll write about the SSIS implementation for the Excel Report refresh.

Getting Error Description and Error Column Name in SSIS 2016...

If you check the Error Output Path of a SSIS Data Flow component, it only contains the ErrorCode and the ErrorColumn (actually this the ID value of the column). By looking at those two values, we cannot get a clear idea about the error.

I checked how it is possible to get the Error Description and the Error Column Name and found the below detail post.
https://www.mssqltips.com/sqlservertip/4066/retrieve-error-column-in-ssis-2016/

But that post is written before the SQL Server 2016 is released and due to that there are some differences for the Code.

In this post I am going to provide the code and some enhancements done for how to get the Error Description and Error Column Name for SSIS 2016.

To get the Error Description and the Error Column Name, for the Error Output path, you have to add a Script Component.
Sample implementation will be as below, where we
- Union all the error records
- Get the Error Description and Error Column Name using a Script Component
- Write the error records with those details to a CSV file


In the Script Component, ErrorCode and ErrorColumn are selected as Input Columns


As Output Columns we need to add columns as ErrorDescription and ErrorColumnName, where the relevant values will be assigned in the code.


Then to add the require code, click on the Edit Script


In that the added code is as below

public override void Input0_ProcessInputRow(Input0Buffer Row)
    {
        /*
         * Add your code here
         */
        Row.ErrorDescription = this.ComponentMetaData.GetErrorDescription(Row.ErrorCode).Trim();
        var componentMetaData130 = this.ComponentMetaData as IDTSComponentMetaData130;

        string errorColumnName = "";

        if (componentMetaData130 != null)
        {
            if (Row.ErrorColumn > 0)
            {
                errorColumnName = componentMetaData130.GetIdentificationStringByID(Row.ErrorColumn);
            }
            else
            {
                errorColumnName = "NA";
            }

        }

        if (errorColumnName != "NA")
        {
            string searchStr = "Columns[";
            int lenSearchStr = searchStr.Length;
            int startIndex = errorColumnName.IndexOf(searchStr) + lenSearchStr;
            errorColumnName = errorColumnName.Substring(startIndex);
        }

        Row.ErrorColumnName = errorColumnName;
    }


If you just get the column name using the GetIdentificationStringByID method, the output will be as below.
OLE DB Destination.Inputs[OLE DB Destination Input].Columns[COLUMN_NAME]

Actually for the who ever managing the data, they do not need to know the SSIS Component which produced the error and they will be only interested about the column name and the error.
That is why only the Column Name is extracted using the below section in the above code

if (errorColumnName != "NA")
        {
            string searchStr = "Columns[";
            int lenSearchStr = searchStr.Length;
            int startIndex = errorColumnName.IndexOf(searchStr) + lenSearchStr;
            errorColumnName = errorColumnName.Substring(startIndex);
        }

After that error records will be written to a CSV file and we can share it with responsible parties.


Moving file from one folder to another in Azure Blob Storage using SSIS

In this post I'll explain how we can move a file from a folder in Azure Blob Storage Container to another folder in the same Container, and delete the original file.

Lets assume the Blob Container name is BlobContainer and the folder names are Folder1 and Folder2. Assume the file name as BlobFile.csv
File will be moved from one folder to another based on the file URL, by using WebClient in C#.

You can generate the File URL as below
BlobStorageURL=https://blobstorage.blob.core.windows.net
(blobstorage is the account name)

Then existing file URL is
https://blobstorage.blob.core.windows.net/BlobContainer/Folder1/BlobFile.csv

URL for the move file is
https://blobstorage.blob.core.windows.net/BlobContainer/Folder2/BlobFile.csv

As I mentioned in my previous post, you can get the file name of the file, available in the Azure Blob Storage using a Foreach Loop Container and possible to set those File URL values based on the file name.

Addition to above we need to know the Shared Access Signature value for each folder.
If you do not have those values, you can get the Shared Access Signature value as below.
To get it for Folder1, go to the Folder1 using Microsoft Azure Storage Explorer and right click on Folder1.
Then select Get Shared Access Signature.


Then you will get a window as below.


In that first things is make sure that you have provided the Expiry time accordingly.
Then put the tick on Write and Delete as well, since it is needed for our requirement.
After that click on Create and you will get the below window


To get the Shared Access Signature value, click on the Copy button under Query string.
The best things is to have that value in a Project Parameter in SSIS. Then when ever needed, you will be able to easily change it.

Follow the same steps for Folder2 as well.

As a best practice, I stored the Shared Access Signature values in two Project Parameters as SASFolder1 and SASFolder2.
Blob file URLs are store in package variables as OriginalBlobFileURL and MoveBlobFileURL

To move the file, I used a Script Task and Variables section of the Script Task Editor is as below


Click on the Edit Script to add the below code

string sasFolder1 = Dts.Variables["$Project::SASFolder1"].Value.ToString();
string sasFolder2 = Dts.Variables["$Project::SASFolder2"].Value.ToString();
string originalBlobFileURL = Dts.Variables["User::OriginalBlobFileURL"].Value.ToString();
string moveBlobFileURL = Dts.Variables["User::MoveBlobFileURL"].Value.ToString();

try
 {
        HttpClient client = new HttpClient();
        client.DefaultRequestHeaders.Add("x-ms-copy-source", originalBlobFileURL + sasFolder1);
        //copy file from Folder1 to Folder2
       HttpResponseMessage response = await client.PutAsync(moveBlobFileURL + sasFolder2, null);
       if (response.StatusCode == HttpStatusCode.Accepted || response.StatusCode == HttpStatusCode.Created)
         {
              client.DefaultRequestHeaders.Clear();
              // delete the original file in the Folder1
              HttpResponseMessage result = await client.DeleteAsync(originalBlobFileURL + sasFolder1);
              if (result.StatusCode == HttpStatusCode.Accepted || result.StatusCode == HttpStatusCode.Created)
               {
                        Dts.TaskResult = (int)ScriptResults.Success;
                        return;
               }
       }
       Dts.TaskResult = (int)ScriptResults.Failure;
}
catch (Exception ex)
{
      Dts.TaskResult = (int)ScriptResults.Failure;
}


Build the code and Save it.
Click Ok button in the Script Task Editor.
That is all...


Configuring SSIS Foreach Loop Container for Azure Blob Storage

Like we iterate through files in File System, we can iterate through files in Azure Blob Storage, using SSIS Foreach Loop Container.
If you consider about the Blob Storage structure, there will be Containers and inside those containers, you will find Folders.

Below Project Parameters are added to store those configurations information
BlobContainer - Stores the Blob Container name
BlobFolder - Stores the Folder name
ConnStr_AzureStorage - Stores the connection string value for the Azure Blob Storage
(Ex: DefaultEndpointsProtocol=https;AccountName=blobstorageaccountname;AccountKey=accountkey;EndpointSuffix=core.windows.net)

Addition to those, package variable is added to store the Blob File Name as BlobFileName.

To create a connection to the Azure Blob Storage, right click on the Connection Managers section in the Package and select New Connection

In the Add SSIS Connection Manager window, select AzureStorage type and click Add


Then you will get the Azure Storage Connection Manager Editor window.


In that select Use Azure Account and provide the relevant Storage account name and Account key values.
Then test the connection using Test Connection button.
If it is Successful, click on the OK button. Otherwise please check the provided Storage account name and Account key values.
To set the Connection String value using the ConnStr_AzureStorage Project Parameter, select the Azure Connection and go the Properties tab.
In that under Expressions section, add the ConnStr_AzureStorage project parameter value to the ConnectionString property.

Once it is done, to configure Foreach Loop Container, drag and drop Foreach Loop Container to the package Control Flow and double click on it.
In the Collection section, click on the down arrow under Enumerator, and select Foreach Azure Blob Enumerator


Then select the previously added Azure Connection for the Azure storage connection manager and to provide the relevant values for the Blob container name and Blob directory values, click on the ... in front of the Expressions.


Set the BlobContainer  and BlobPath property values using the BlobContainer and BlobFolder project parameters.


To assign the Blob File Name to the BlobFileName variable, go to the Variable Mappings section and set the variable.


Now you have configured the Foreach Loop Container for Azure Blob Storage and you can do the required operations inside the Foreach Loop Container by using the File Name available in the BlobFileName variable.


SSIS Script Component to Trim data in all the columns...

There are situations that we may have large number of input columns and we may need to Trim the data in those. Normally we can use Derived Column component to get done this, but in this scenario it is very difficult due to the large number of columns.
In such scenario it is easy to use Script Component and it can be configured to trim data for any number of input columns.

Solution is as below.


We can have a Script Component to trim data and there are some steps to follow.
We need to select on the required input columns and change the Usage Type of those columns to ReadWrite as below image.


Then click on Edit Script and follow the below steps to add the required code in C#
Add the using System.Reflection; namespace
Then modify the Input0_ProcessInputRow method as below
 public override void Input0_ProcessInputRow(Input0Buffer Row)
    {
        /*
         * Add your code here
         */
        foreach (PropertyInfo p in Row.GetType().GetProperties())
        {
         
           if (object.ReferenceEquals(p.PropertyType, typeof(string)))
            {
                if (p.GetValue(Row, null) != null)
                {
                    p.SetValue(Row, TrimData(p.GetValue(Row, null).ToString()), null);
                }
            }
        }
    }

The TrimData method is below
 public string TrimData(string ValueOfProperty)
    {
        // Uppercase the value
        ValueOfProperty = ValueOfProperty.TrimStart().TrimEnd();
        return ValueOfProperty;
    }


The complete code after those modifications is as below

#region Namespaces
using System;
using System.Data;
using Microsoft.SqlServer.Dts.Pipeline.Wrapper;
using Microsoft.SqlServer.Dts.Runtime.Wrapper;
using System.Reflection;
#endregion

///


/// This is the class to which to add your code.  Do not change the name, attributes, or parent
/// of this class.
///
[Microsoft.SqlServer.Dts.Pipeline.SSISScriptComponentEntryPointAttribute]
public class ScriptMain : UserComponent
{
    ///


    /// This method is called once, before rows begin to be processed in the data flow.
    ///
    /// You can remove this method if you don't need to do anything here.
    ///
    public override void PreExecute()
    {
        base.PreExecute();
        /*
         * Add your code here
         */
     
    }

    ///


    /// This method is called after all the rows have passed through this component.
    ///
    /// You can delete this method if you don't need to do anything here.
    ///
    public override void PostExecute()
    {
        base.PostExecute();
        /*
         * Add your code here
         */
    }

    ///


    /// This method is called once for every row that passes through the component from Input0.
    ///
    /// The row that is currently passing through the component
    public override void Input0_ProcessInputRow(Input0Buffer Row)
    {
        /*
         * Add your code here
         */
        foreach (PropertyInfo p in Row.GetType().GetProperties())
        {
         
            if (object.ReferenceEquals(p.PropertyType, typeof(string)))
            {
                if (p.GetValue(Row, null) != null)
                {
                    p.SetValue(Row, TrimData(p.GetValue(Row, null).ToString()), null);
                }
            }
        }
    }

    // New function that you can adjust to suit your needs
    public string TrimData(string ValueOfProperty)
    {
        // Uppercase the value
        ValueOfProperty = ValueOfProperty.TrimStart().TrimEnd();
        return ValueOfProperty;
    }
}

After that Build the code, save and close it. Then connect the Script Component with the Output source.

This can be used for any number of columns and it will loop though the available input columns and trim the data on those.

How to prevent first time cube access performance issue, after a cube refresh with Dynamic Security...

Recently we faced an issue that, after a cube refresh there is a performance issue while accessing the cube. This happens since the dynamic security was implemented.
This performance issue can be prevented by building cache for each user.

SSIS package was implemented to build the cache. In the package the approach used was to execute the create cache mdx command using each user id.
You can connect to the SSAS cube with different users by using the EffectiveUserName property in the Connection String.

The structure of the package is as shown below


Steps:

  • Create four variables as shown below. 


  • OLAP_ConnString is the value used as the connection string for SSAS cube. It includes the user name by using the EffectiveUserName property.
  • UserNames variable is used to get the list of users. 
  • Each user is assigned to UserName variable in the Foreach Loop Container.


  • Execute SQL Task us used with in the Foreach Loop Container use to create the cache using the MDX command. Since Effective User Name property is set using the UserName variable, the MDX command is executed for the particular user. That means the cache was created for that user.


After a cube refresh, we need to execute this package and it will prevent the first time access performance issue.


Problems when trying to get changed records from...

The SSIS Package was configured to get only the net changes by applying the CDC processing mode as Net in the CDC Source.
But when the SSIS package was executed, got the below error message.
"Problems when trying to get changed records from dbo_testcdc. Reason - Timeout expired. The timeout period elapsed prior to completion of the operation or the server is not responding..".

The issue was fixed by using the below steps.


  • Right click on the CDC Source and select Properties.
  • In the properties window find the Command Timeout and change it to 0. Default value of this property is 30.
  • Save the package and execute it. It should run without any issue.

CDC Failed when changing the database or the CDC State table in SSIS Package...

Recently we faced that the SSIS packages got failed which use CDC, due to a validation issue when the data source is pointing to a different database or the CDC State table is pointing to a different one.

The solution is to set the Delay Validation property to True.
But I found that sometimes this is not enough in the package level and need to set it in the Data Flow and the set ValidateExternalMetaData to False in the CDC Source as well.

Hope this is helpful for you as well.

Passing Variable value from Parent package to a Child Package in SSIS 2012

If we are executing a package from another package, we may want to pass variable values from the parent package to the child package. In SSIS 2008, we get done this using the Parent Variable in the Package Configurations. But in SSIS 2012 the approach is different.

To achieve this we have to use the Package Parameters in the child package.
In this post I am using the Pkg_Main as the parent package and the Pkg_Sub as the child package. I want to pass the ParamValue_Parent  variable value in the Pkg_Main package to the Pkg_Sub package.

For that I used the below steps

Go to the Pkg_Sub package (child package) and create the ParamValue_Sub package parameter as shown in the below image.


Then create the ParamValue_Parent variable in the Pkg_Main package and set the value accordingly.


Then add the Execute Package Task to the Pkg_Main package Control Flow and select the Pkg_Sub package to execute.

To pass the ParamValue_Parent  variable value in the Pkg_Main package to the ParamValue_Sub parameter in the Pkg_Sub package, go to the Parameter bindings in the Execute Task Editor window and click on Add. Then select the Child package parameter as ParamValue_Sub and the Binding parameter or variable as the User::ParamValue_Parent as shown in the below figure.


Click on Ok and that is it. After that when you execute the Pkg_Main package, the value available for the ParamValue_Parent will be passed to the ParamValue_Sub parameter in Pkg_Sub package.

The job failed. Unable to determine if the owner (Domain\User) of job SSISJob has server access...

I created a SSIS package, which connects to the SQL Server database using windows authentication.
Package run successfully when I executed it in the BIDS and I tried to schedule a job to execute the package.

When I tried to run the job, I got the below error message.

The job failed.  Unable to determine if the owner (Domain\User) of job SSISJob has server access (reason: Could not obtain information about Windows NT group/user 'Domain\User', error code 0x5. [SQLSTATE 42000] (Error 15404))

To fix it what I had to do is set the Log On account of the SQL Server Agent to a domain account.
Normally it is set for a built in account.
Then check whether the Owner of the job is set to the same domain user as the Log On account.

This fixed my problem and I was able to run the job successfully. 

SSIS Row Count Component...

Recently I used the Row Count component in SSIS toolbox. I used it in a Data Flow to set the row count of a Lookup match output. When I tried to get that set value in a Conditional Split component in the same Data Flow, I found that the variable has the default value and the row count was not set for that variable.

But when I get the variable value using Script Task, I found that the variable has the row count.
Actually the issue is the row count value is available after the completion of the Data Flow task. We cannot access the variable inside the same data flow task which sets the row count value.

Due to that I have to use two Data Flow tasks. In the first data flow task I set the row count value to a variable using Row Count component and in the other data flow task, the variable value is checked and do the required processing.

Replace double quotes in SSIS...

Recently I had a requirement to load csv file data which is generate from FoxPro.
But when I checked the csv file, found that it has additional double quotation mark at the start and the end of the value. As an example if the actual branch value is Branch1, the csv file has that as "Branch1".

Therefore to get the actual value I had to remove those double quotation mark and able to do it using REPLACE function.

I added a Derived Column component to the package and in that replace the branch column value after removing double quotes. For that I used the below expression.
   1: LTRIM(RTRIM(REPLACE([branch],"\"","")))

That is it, It will give you the actual branch value correctly as Branch1.

[Connection manager "Excel Connection Manager"] Error: The requested OLE DB provider Microsoft.ACE.OLEDB.12.0 is not registered...

While trying to execute a package in 64 bit SSIS, I got the below error
[Connection manager "Excel Connection Manager"] Error: The requested OLE DB provider Microsoft.ACE.OLEDB.12.0 is not registered. If the 64-bit driver is not installed, run the package in 32-bit mode. Error code: 0x00000000.An OLE DB record is available. Source: "Microsoft OLE DB Service Components" Hresult: 0x80040154 Description: "Class not registered".

To fix it just right click on the SSIS project in the solution explorer and click Properties. Then click on the Debugging of the Configuration Properties. You will find Run64BitRuntime under Debug Options. Set it to False and execute the package. You will not get the above error anymore. 

SSIS Toolbox in SQL 2012...

When we open a Integration Service Project created using SQL 2008, all the required components are available in the Toolbox tab. I tried to upgrade this SSIS package to use the SQL 2012 environment. Upgrading process was successfully completed and I was able to open the package. But the Toolbox tab is empty and could not find any component as in the BIDS 2008. Those components are in the SSIS Toolbox tab. Click SSIS -> SSIS Toolbox to view it.

Unspecified Error in Microsoft Access Data Engine...

While trying to access Excel 2007 file using SSIS Excel Source component, I got an error in the Microsoft Access Data Engine as Unspecified Error. I was using SQL Server Business Development Studio 2008. I got this error trying to get the Sheets in the excel file after creating the connection.

I tried to find the reason and the solution for this issue and able to find a helpful blog.
http://ddkonline.blogspot.com/2010/08/ssis-2008-unspecified-error-and-could.html

According to that post the this is related to the driver issue. After following that post I was able to fix is by re-installing the driver in the below link.
http://www.microsoft.com/downloads/details.aspx?FamilyID=7554f536-8c28-4598-9b72-ef94e038c891&displaylang=en

After the installation completes, the issue will be fixed. If you already opened the Business Development Studio project, just close it and re-open it. 

Extracting QuickBooks data using SSIS Package...

To extract data from QuickBooks, I used QODBC driver.
You can download a trial version of it using below link

When we installed the QODBC driver, if ODBC entry is not available for it, we can add it as System Data Sources. For that go to the Control Panel --> Administrative Tools -->Data Sources(ODBC)

Then you will get the ODBC Data Source Administrator window. In that click on the System DSN and you will get a screen as below

In that click on the add button and select the QODBC Driver for QuickBooks as shown in the below figure.

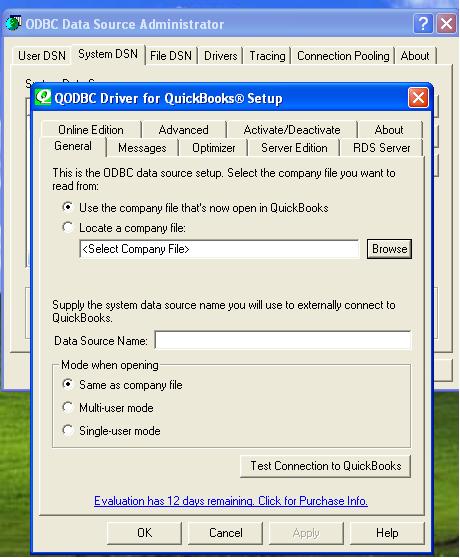
Then you have to configure the ODBC connection. Initial set up window is as given below.

If you want to set a different company profile, click on the Browse button and select the qbw file as shown in the below figure.

Then you can use the created ODBC connection in SSIS package.
Create a new Integration Service Project and add a Data source. In the New Data Source window, select the Provider as Odbc Data Provider as in the below figure.

Then select the relevant ODBC data source name for the QuickBooks and if any authentication is required provide those too. Then click on the Test Connection button and verify the connection is possible.

Then add a new package to the project and add a Data Flow task. Then add a ADO NET Source and provide the created data source as the ADO .NET connection manager. If you created the connection correctly, you will be able to select the required table as shown in the figure.

In this example I just added a DataReader Destination component to view the data using a Data Viewer.

Connecting to Pervasive SQL using SSIS

I got an requirement from a client as connect to Pervasive SQL database system and retrieve data from it.

I was able to achieve that requirement using SSIS. For that we have to install the OLEDB driver for Pervasive SQL. After that create a SSIS package and add a OLEDB Source in the Data Flow Task. Then create a New OLEDB connection.
Select the Provider as Native OLEDB\Pervasive PSQL OLEDB Provider.
Then you have to provide the server or file name and the location. But there some confusion about those values. Because for this provider you have to provide the server which contains the Pervasive SQL database as the Location and the Pervasive SQL database as the Server or file name value. Then you have to provide the Initial Catalog value as well. Figure is shown below


Then click on All and under Pooling yow will see OLEDB Services. Select the value as Disable All as shown in the below figure.


Otherwise you will get and error as shown below figure while trying to preview data.


Then select that connection in the OLEDB Source and use SQL Command to retrieve data. Because I tried to get the list of tables and unable to do it due to memory exception.

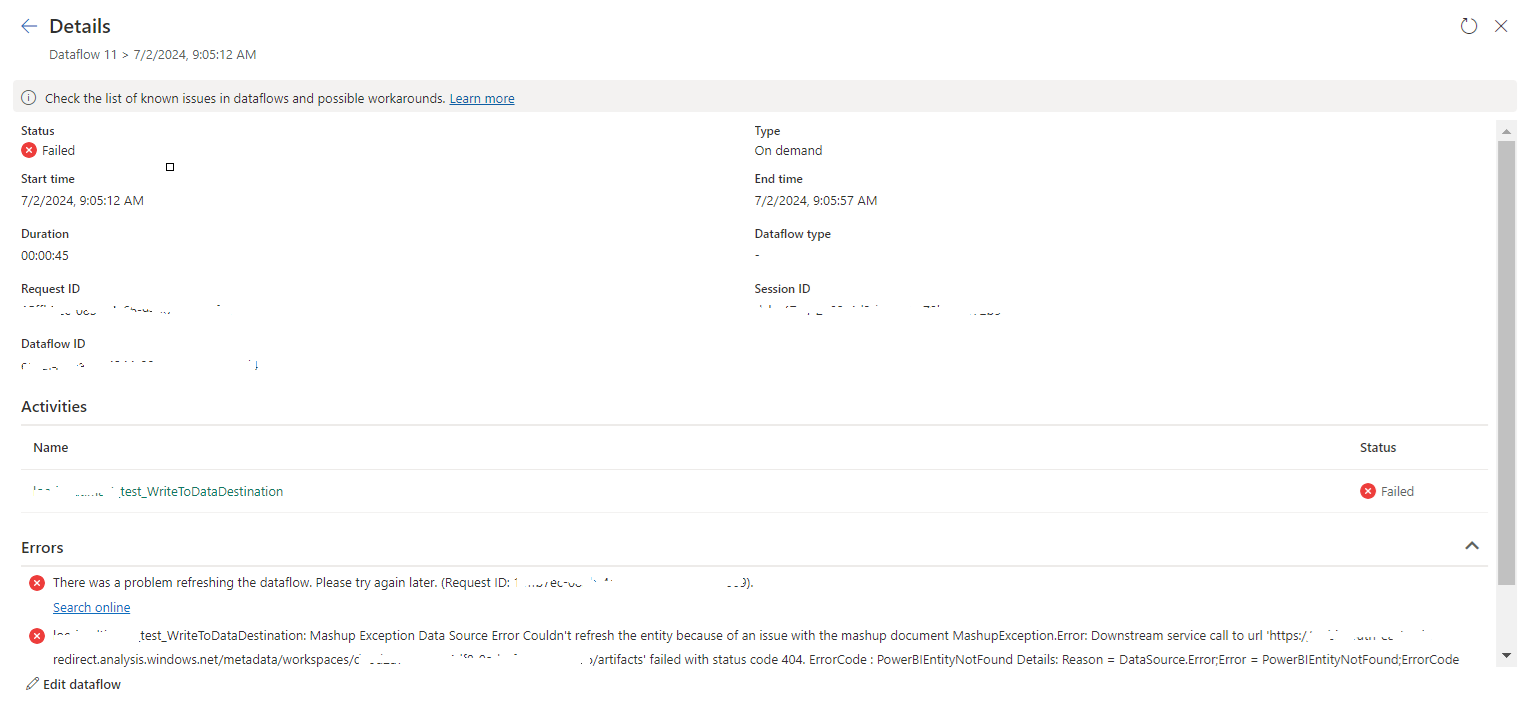
tablename_WriteToDataDestination: Mashup Exception Data Source Error Couldn't refresh the entity...

 Once a Dataflow is created and published on Fabric, got the below error while refreshing the Dataflow. tablename_ WriteToDataDestination: M...