tablename_WriteToDataDestination: Mashup Exception Data Source Error Couldn't refresh the entity...

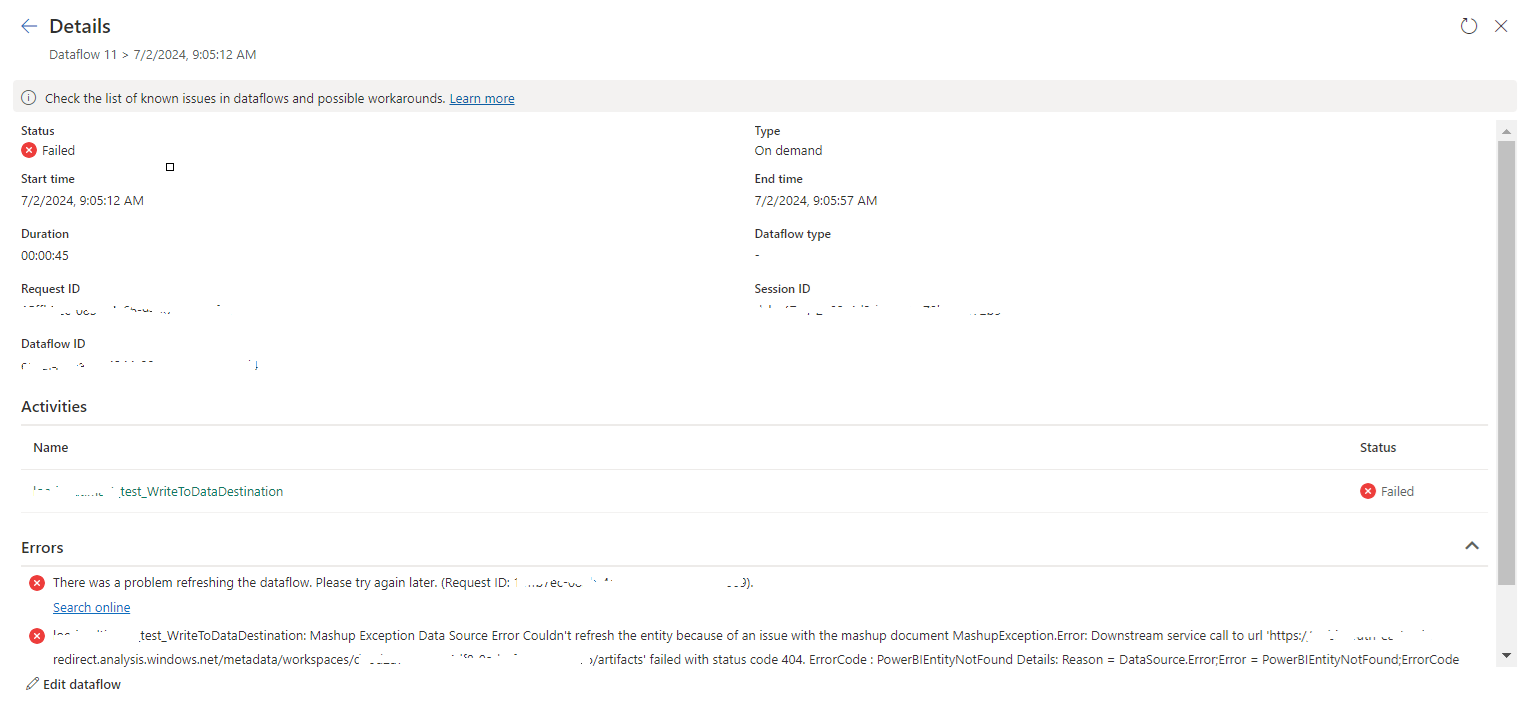
 Once a Dataflow is created and published on Fabric, got the below error while refreshing the Dataflow.

tablename_WriteToDataDestination: Mashup Exception Data Source Error Couldn't refresh the entity because of an issue with the mashup document MashupException.Error: Downstream service call to url 'https://xxxxxx.analysis.windows.net/metadata/workspaces/xxxxxxxxxxxxx/artifacts' failed with status code 404. ErrorCode : PowerBIEntityNotFound Details: Reason = DataSource.Error;Error = PowerBIEntityNotFound;ErrorCode = PowerBIEntityNotFound;RequestId = xxxxxxxxx;RequestUrl = https://xxxxxxxxxxx.analysis.windows.net/metadata/workspaces/xxxxxxxxxxxxxx/artifacts;ErrorMessage = PowerBIEntityNotFound;Microsoft.Data.Mashup.Error.Context = User GatewayObjectId: xxxxxxxxxxxx


This error is due to the destination is not set. Right click on the Dataflow query and select "Enable staging" as below. This will resolve the above issue.


Microsoft Fabric Notebook Execution: AnalysisException

While executing a Fabric Notebook, I got the below error.

AnalysisException: org.apache.hadoop.hive.ql.metadata.HiveException: MetaException(message:Spark SQL queries are only possible in the context of a lakehouse. Please attach a lakehouse to proceed.) 

The reason for this error is, I did not add the relevant Lakehouse to the Notebook.
We need to add the relevant Lakehouse as below:


After that you will not get the above error message.
Hope this will be helpful.


How to add a logo image to a Power BI report in Microsoft Fabric

There is no way to add an image directly to a Power BI report in Microsoft Fabric.
But, you can achieve it using an alternative approach as below.

  • Add a Blank Button

  • Go to the Format button section, then expand the Style under the Button section.


  • Then expand the Fill section


  • Click on Browse and select the image to be added.


  • Use the Image fit option as Fit


Hope this will be helpful...


How to run UPDATE/INSERT/DELETE Statements on Azure SQL Database in Microsoft Fabric Notebook...

You can run UPDATE/INSERT/DELETE Statements on Azure SQL Database in Microsoft Fabric Notebook using Python SQL Driver - pyodbc. 
For the Fabric Notebook, the driver is "{ODBC Driver 18 for SQL Server}"

Sample code is below:

import pyodbc
server = "servername.database.windows.net"
database = "databasename"
username = "user"
password = "password"
driver= "{ODBC Driver 18 for SQL Server}"

strsql = "Your SQL Statement"

with pyodbc.connect('DRIVER='+driver+';SERVER=tcp:'+server+';PORT=1433;DATABASE='+database+';UID='+username+';PWD='+ password) as conn:
    with conn.cursor() as cursor:
        cursor.execute(strsql)

How to execute a notebook from another notebook in Microsoft Fabric...

We can execute a notebook from another notebook in Microsoft Fabric

mssparkutils.notebook.run("child_notebook_name", 60, {"ParameterName": ParameterValue})

Data ingestion methods offered by Azure Synapse Analytics...

Azure Synapse Analytics offers several data ingestion methods and tools to facilitate the process of bringing data into your Synapse Analytics workspace. Here are some of the key data ingestion methods related to Azure Synapse Analytics:

  1. Azure Data Factory:
    • Definition: Azure Data Factory is a cloud-based ETL (Extract, Transform, Load) service that allows you to create, schedule, and automate data pipelines. It supports data movement and transformation from various sources to Azure Synapse Analytics.
    • Use Cases: Ingesting data from on-premises databases, cloud services, and various data stores into Synapse Analytics.
    • Integration: Azure Data Factory provides built-in connectors to Azure services and supports custom data connectors.
    • Advantages: Scalability, workflow orchestration, data transformation capabilities, and integration with Azure services.
  2. Azure Data Factory Data Flows:
    • Definition: Azure Data Factory Data Flows is a visual data transformation feature within Azure Data Factory. It allows you to build data transformation logic using a low-code/no-code approach, making it easier to prepare data for ingestion.
    • Use Cases: Data cleansing, enrichment, and transformation before ingesting into Synapse Analytics.
    • Integration: Seamlessly integrates with Azure Data Factory pipelines.
    • Advantages: Simplified data transformation, graphical interface, and integration with other Azure services.
  3. Azure Logic Apps:
    • Definition: Azure Logic Apps is a cloud-based workflow automation platform that enables you to create workflows to connect and integrate data and services from various sources, including external APIs and applications.
    • Use Cases: Triggering data ingestion based on events or conditions, integrating with external data sources.
    • Integration: Connects to a wide range of services and systems, including Synapse Analytics.
    • Advantages: Workflow automation, event-driven data ingestion, and support for external integrations.
  4. Azure Blob Storage and Azure Data Lake Storage Gen2:
    • Definition: Azure Blob Storage and Azure Data Lake Storage Gen2 are cloud storage solutions that can be used for storing raw data files. These storage solutions can serve as landing zones for data before processing and ingestion into Synapse Analytics.
    • Use Cases: Storing data files from various sources before ETL processing.
    • Integration: Native integration with Synapse Analytics.
    • Advantages: Scalable storage, cost-effectiveness, and compatibility with various data formats.
  5. PolyBase:
    • Definition: PolyBase is a feature within Azure Synapse Analytics that allows you to query and import data from external sources such as Azure Blob Storage, Azure Data Lake Storage, and on-premises SQL Server databases.
    • Use Cases: Querying and importing data from external data sources directly into Synapse Analytics.
    • Integration: Built-in feature of Synapse Analytics.
    • Advantages: Direct querying and importing of external data, reducing the need for complex ETL processes.
  6. Azure Data Share:
    • Definition: Azure Data Share is a service that allows you to share data between Azure services and with external organizations securely. You can use it to share data from your Synapse Analytics workspace with other Azure users or tenants.
    • Use Cases: Sharing data with collaborators, partners, or other Azure services.
    • Integration: Integration with Azure Synapse Analytics for data sharing.
    • Advantages: Secure data sharing, control over data access, and collaboration capabilities.

These data ingestion methods provide a range of options for bringing data into Azure Synapse Analytics, depending on your specific needs and the source of your data. You can choose the method that best fits your data integration requirements and workflow.

How to create an Azure Synapse Analytics workspace...

 Creating an Azure Synapse Analytics workspace involves several steps. Here's a step-by-step guide on how to create one:

1. Log in to Azure Portal:

  • Visit the Azure Portal.
  • Log in with your Azure account credentials.

2. Create a Resource Group (Optional):

  • You can choose to create a new resource group or use an existing one to organize your Synapse Analytics workspace and related resources.

3. Create a Synapse Analytics Workspace:

  • Click the "+ Create a resource" button in the Azure Portal.
  • In the search bar, type "Azure Synapse Analytics" and select it from the results.

4. Configure Synapse Analytics Workspace:

  • In the "Azure Synapse workspace" pane, click the "Create" button.

5. Basics:

  • Fill in the basic information for your workspace:
    • Workspace name: Choose a unique name for your workspace.
    • Subscription: Select your Azure subscription.
    • Resource group: Choose the resource group created in step 2 or create a new one.
    • Region: Select the Azure region where you want to deploy your Synapse Analytics workspace.

6. Security + networking:

  • Configure network settings, firewall rules, and virtual network integration based on your organization's requirements. You can choose to allow Azure services and resources to access this workspace and specify IP firewall rules.

7. Advanced:

  • Under the "Advanced" tab, you can configure settings related to system-managed private endpoints, Power BI integration, and private endpoint connections.

8. Review + Create:

  • Review the settings you've configured to ensure they are accurate.
  • Click the "Create" button to start the deployment process. Azure will validate your settings.

9. Deployment:

  • Azure will begin deploying your Synapse Analytics workspace. This process may take several minutes to complete.

10. Access Your Workspace: Once the deployment is successful, you can access your Azure Synapse Analytics workspace using the Azure Portal or other tools like Azure Synapse Studio. You'll need to configure authentication and access permissions as per your organization's policies.

11. Additional Configuration (Optional): You can further customize your Synapse Analytics workspace by adding data, configuring security, and setting up data pipelines as needed for your specific use case.

That's it! You've successfully created an Azure Synapse Analytics workspace. You can now start using it to build and manage your modern data warehouse, perform data analytics, and run data processing workloads.
tablename_WriteToDataDestination: Mashup Exception Data Source Error Couldn't refresh the entity...

 Once a Dataflow is created and published on Fabric, got the below error while refreshing the Dataflow. tablename_ WriteToDataDestination: M...