MS SQL Function to Convert the Julian Date to the SQL Date Format

Below I put the query for a SQL Function which converts the Julian
date in int data type to SQL Date format.


IF EXISTS (SELECT * FROM sys.objects WHERE object_id =
OBJECT_ID(N'dbo.Convert_Julian') AND TYPE IN (N'FN', N'IF', N'TF',
N'FS', N'FT'))

DROP FUNCTION dbo.Convert_Julian

GO

CREATE FUNCTION dbo.Convert_Julian(@idate INT)
Returns DATE
WITH EXECUTE AS CALLER

AS

BEGIN
DECLARE @oDate DATE, @year VARCHAR(10),@intYear INT,@sdate
VARCHAR(10),@noOfDays VARCHAR(10),@intNoOfDays INT,@month INT,@day
INT,@sMonth VARCHAR(10),@sDay VARCHAR(10),@sMonthc VARCHAR(10),@sDayc
VARCHAR(10)

SELECT @sdate=CONVERT(VARCHAR(50),@idate)

IF (@idate=0)

SET @oDate = CAST(0 AS DATETIME)

ELSE BEGIN
SET @year=SUBSTRING(@sdate,1,4)
SET @noOfDays=SUBSTRING(@sdate,5,3)
SELECT @intYear=CONVERT(INT,@year)
SELECT @intNoOfDays=CONVERT(INT,@noOfDays)

IF (@intNoOfDays<=31)
BEGIN
SELECT @month=1

IF(@intNoOfDays=31)
SELECT @day=31

ELSE
SELECT @day=@intNoOfDays
END

IF(@intNoOfDays>31 AND @intNoOfDays <= 59)
BEGIN
SELECT @month=2

IF(@intNoOfDays=59)
SELECT @day=28
ELSE
SELECT @day=@intNoOfDays-31

END

IF(@intNoOfDays>59 AND @intNoOfDays<=90)
BEGIN
SELECT @month=3

IF(@intNoOfDays=90)
SELECT @day=31
ELSE
SELECT @day=@intNoOfDays-59
END

IF(@intNoOfDays>90 AND @intNoOfDays<=120)
BEGIN
SELECT @month=4

IF(@intNoOfDays=120)
SELECT @day=30
ELSE
SELECT @day=@intNoOfDays-90
END

IF(@intNoOfDays>120 AND @intNoOfDays<=151)
BEGIN
SELECT @month=5

IF(@intNoOfDays=151)
SELECT @day=31
ELSE
SELECT @day=@intNoOfDays-120
END

IF(@intNoOfDays>151 AND @intNoOfDays<=181)
BEGIN
SELECT @month=6

IF(@intNoOfDays=181)
SELECT @day=30
ELSE
SELECT @day=@intNoOfDays-151
END

IF(@intNoOfDays>181 AND @intNoOfDays<=212)
BEGIN
SELECT @month=7

IF(@intNoOfDays=212)
SELECT @day=31
ELSE
SELECT @day=@intNoOfDays-181
END

IF(@intNoOfDays>212 AND @intNoOfDays<=243)
BEGIN
SELECT @month=8

IF(@intNoOfDays=243)
SELECT @day=31
ELSE
SELECT @day=@intNoOfDays-212
END

IF(@intNoOfDays>243 AND @intNoOfDays<=273)
BEGIN
SELECT @month=9

IF(@intNoOfDays=273)
SELECT @day=30
ELSE
SELECT @day=@intNoOfDays-243
END

IF(@intNoOfDays>273 AND @intNoOfDays<=304)
BEGIN
SELECT @month=10

IF(@intNoOfDays=304)
SELECT @day=31
ELSE
SELECT @day=@intNoOfDays-273
END

IF(@intNoOfDays>304 AND @intNoOfDays<=334)
BEGIN
SELECT @month=11

IF(@intNoOfDays=334)
SELECT @day=30
ELSE
SELECT @day=@intNoOfDays-304
END

IF(@intNoOfDays>334 AND @intNoOfDays<=365)
BEGIN
SELECT @month=12

IF(@intNoOfDays=365)
SELECT @day=31
ELSE
SELECT @day=@intNoOfDays-334
END


SELECT @sMonth=CONVERT(VARCHAR(10),@month)
SELECT @sDay=CONVERT(VARCHAR(10),@day)

IF(LEN(@day)=1)
SELECT @sDayc='0'+@sDay
ELSE
SELECT @sDayc=@sDay


IF(LEN(@month)=1)
SELECT @sMonthc='0'+@sMonth
ELSE
SELECT @sMonthc=@sMonth


SET @oDate=CONVERT(DATE,@year+'.'+@sMonthc+'.'+@sDayc,102)

END

RETURN @oDate

END

GO


Then you can get the converted date value by executing a simple query as given below

SELECT dbo.Convert_Julian(JulianDateField) FROM YOURTABLE


If you have any issues please put a comment

Creating a Connection to DB2 in SQL Server Integration Project

In this post, IBM DB2 UDB for iSeries IBMDA400 OLE DB provider is used to create the connection.
To create a connection in SQL Server Integration Project, Right click on the Connection Managers area and select New OLE DB Connection... as shown in the below figure.


Then select the Provider in the top of Connection Manager as the Native OLE DB\ IBM DB2 UDB for iSeries IBMDA400 OLE DB Provider as shown in the below figure.


Then Click on the Data Links... button to provide more details and you will get a screen like a below one.


Then provide the Server Name or IP Address of the Server for the Data Source and provide the required credentials.
After that to provide the required DB2 library click on the All tab and double click on Catalog Library List.
Then you will get a screen as shown below.


Enter the DB2 Library for the Property Value and click OK.

Then you can test the created connection by clicking Test Connection button and if you provided those details correctly you will get a message as shown below.


If you get a message box mentioning Test connection succeeded, that means you are ready to go. Click OK and go to your next step in the ETL process...

Changing the appearance of Doughnut Chart in SQL Server 2008 Reports

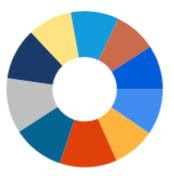
When you add a Doughnut chart to a SQL Report, it initially looks like as shown below.


You can change the appearance of the chart and make it more attractive by changing the chart properties.
Some of the attractive doughnut chart are shown below.


Figure 1


Figure 2

To change the doughnut chart as shown in Figure 1, go to the chart series properties window.
Then expand the CustomAttributes and set the PieDrawingStyle to Concave as shown in below figure.


To change it as to shown in Figure 2, just change the PieDrawingStyle to SoftEdge.
By doing that we can make our doughnut chart more attractive.

Retrieving Log Details Stored in SQL Server Database

In some scenarios we may store log details in SQL Server. Those data stored in the table named as "sysdtslog90".
Therefore you can retrieve those details using the below simple query
SELECT * FROM dbo.sysdtslog90

Easy way to Customize MOSS 2007 Master Pages using SharePoint Designer 2007

Using SharePoint Designer 2007, you can easily customize your SharePoint Master pages. If you want to create a new master page you can easily do it. To do that first copy the default.master page and rename it to whatever name you want (Master page can be found at "C:\Program Files\Common Files\microsoft shared\Web Server Extensions\12\TEMPLATE\GLOBAL").
Then go to the your SharePoint site and go to Site Settings. Click Master Pages under Galleries category and upload the renamed master page to the Master pages.

Then open the SharePoint Designer 2007 and click on the Open Site in the File menu.
Then copy the url of the your SharePoint site and open it in SharePoint Designer 2007. You can see the master pages of the site in the catalogs folder. Double click on the renamed master page to edit in SharePoint Designer.

Then you can customize that page according to your requirments. If you want to remove some parts in the master page, the best thing is comment those code instead of deleting those in the design mode. The reason is if we delete those in design mode it gives errors in the design mode or when we publish them.

After customizing the page click on Save. If you want to set the customized Master Page as the default master page, righ click on it and select "Set as Default Master Page".

That's all. After that you can use the customized master page for other SharePoint Web Applications too.

Avoiding ASP.Net Browser Refresh Problem

Lets assume you delete an item in a gridview and you will get a confirmation message box to decide whether delete that item or not. After completing that task, refresh the page. Sometimes you will get the previous confirmation message box.
Same thing can happen when you insert particular record for a button click event. When you refresh the page that same record will be inserted again.

Below link contains a sample code to avoid it


Code:


using System;
using System.Collections.Generic;
using System.Linq;
using System.Web;
using System.Web.UI;
using System.Web.UI.WebControls;

namespace WebApplication1
{
public partial class _Default : System.Web.UI.Page
{
protected void Page_Load(object sender, EventArgs e)

{
if (!IsPostBack)
{
Session["CheckRefresh"] = Server.UrlDecode(System.DateTime.Now.ToString());
}
}

protected void Button1_Click(object sender, EventArgs e)
{
if (Session["CheckRefresh"].ToString() == ViewState["CheckRefresh"].ToString())
{
Label1.Text = "Hello";
Session["CheckRefresh"] = Server.UrlDecode(System.DateTime.Now.ToString());
}
else
{
Label1.Text = "Page Refreshed";
}
}

protected void Page_PreRender(object sender, EventArgs e)
{
ViewState["CheckRefresh"] = Session["CheckRefresh"];
}
}
}

Adding Multivalued Parameter as a Filter for a SQL Server Report

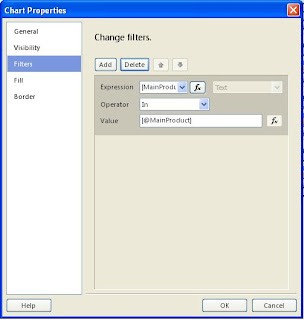
To add a multivalue report parameter as filter for a SQL Report click Filters in Chart properties and add the Report Parameter as shown in the given figure.
The only difference is you have to choose the operator as "In". It set the the selected value to an array and filter the report

Problem with Publishing PerformancePoint Dashboard to SharePoint site

If you get and error message in SharePoint site after publishing PerformancePoint Dashboard to SharePoint site that might occur due to the problems with configuring PerformancePoint monitoring server.
When you configuring the PerformancePoint monitoring server, you should provide the URL of the SharePoint site which you use to display the PerformancePoint Dashboards. Then the configuration process will modify the web.config file of the relevant SharePoint Site

Problems occur while creating new Web Application in MOSS 2007

  • When you try to create a new application using SharePoint Central Administration, sometimes "Reset Internet Information Services" may be disabled. It might be due to the "Windows SharePoint Services Administration" service is not started. After starting that service the mentioned service should be enabled.
  • Also after insalling and configuring MOSS 2007, when you try to create a new web application using SharePoint Central Administration by clicking OK button in the new web application page nothing will happen. To overcome that issue, you have to add the SharePoint Central Administration site to the Local Intranet using the Internet Explorer.

Adding Horizontal Gauges for SQL Server 2008 Reports

  • First add a matrix to the report
  • Then delete the row group and add rows as required
  • After that open the column group property box and add the below expression to the "Group On" under general tab
=RowNumber(Nothing)

  • Then add the values to the data row cells
  • After that add a list to the design
  • For the List get the Row Groups property window and add the below expression
=Ceiling(RowNumber(Nothing)/3)

  • Then change the "Nothing" in the column group properties to the Name of the Row group of the List
  • Then drag the matrix inside to the List
  • That's all. You will get the 3 Gauges for each row.

Install Windows XP to a Windows Vista installed Laptop

If you are trying to install Windows XP to a Laptop where Windows vista is already installed, you will get a blue screen at the Windows Startup in XP installation process. This is happened due to the SATA hard disk.
To overcome this problem you have to change the BIOS settings. First go to the "Advanced" tab in BIOS Settings and you can find the "SATA Controller Mode" at the bottom.
Change the SATA Controller Mode from "AHCI" to "Compatibility". Then Save the Changes.
After that you can install Windows XP.
Good Luck...

Unlock Huawei E220 HSDPA Modem

Below blog contains steps to unlock HSDPA Modem

http://www.unlocke220.blogspot.com/


Good Luck...

Publish a browser-enabled form to a SharePoint 2007 form library using MS Office Infopath 2007

To publish a MS Office InfoPath form with browser enabled feature, there are some requirements need to be satisfied. First one is the Form services should be installed on the server. Then the Form services should be activated on the site or site collection which contains the form library. If those two requirements are satisfied, then we can publish a browser enable form to SharePoint 2007 library using below procedure.

First we need to change the Form Library Settings. We can change that settings as required using below steps.

  1. Go to the Form Library to which you published the InfoPath form template.
  2. Click Settings on the Form Library menu bar and choose Form Library Settings from the drop-down menu.
  3. On the Customize page under the General Settings category, click Advanced settings.
  4. On the Form Library Advanced Settings: page under the Browser-enabled Documents category, choose Display as a Web page.

The reason to change that setting is, if the InfoPath client application has been installed on a PC, it will be used by default to open forms that have been stored in a Form Library unless the setting Display as a Web page has been set on that Form Library. This setting will force forms to open in a browser even if the InfoPath client has been installed on the PC from where the form is being opened.


Most probably this will do our task. But there may be a situation where the administrator has disabled the setting to Render form templates that are browser-enabled by users from SharePoint Central Administration. In such a situation even though a form template has been forced to open in a browser through the Form Library setting as discussed in above or not, users will not be able to open InfoPath forms in a browser.

To overcome that issue we have to enable the Render form templates that are browser-enabled setting by using below steps

  1. Open SharePoint Central Administration.
  2. Click the Application Management tab.
  3. On the Application Management page under the InfoPath Forms Services category, click Configure InfoPath Forms Services.
  4. On the Configure InfoPath Forms Services page under the User Browser-enabled Form Templates category, check Render form templates that are browser-enabled by users.

After completing those steps you can publish MS Office InfoPath 2007 form to SharePoint Form Library with browser enabled feature.

Scoring and Ranking in Lucene.Net

Scoring feature is used to prioritize and sort the search results by considering their relevance to the search query. For the scoring formula several facts are used. Below the formula which is used to calculate the score value is shown.


Score for term t in document d = ∑ tf (t in d).idf(t).boost(t.field in d).lengthNorm(t.field in d)

Below table is listed how those functions are calculated and the description of those functions.


Function

Description

tf (t in d) = sqrt(freq)

Term frequency factor for the term (t) in the document (d).

This factor result to have high score value for a document

where more frequent a term occurred.

idf(t) = log(numDocs/(docFreq+1)) + 1

Inverse document frequency of the term. 
Common terms are less important than uncommon ones.
This factor gives high value to a term which occurs only in few
documents and low value to a term which occurs in most
documents

boost(t.field in d)

Field boost, as set during indexing. Boosting is used to give high

priority for a term or field. This is useful for similarity search

to provide high priority for most important area.

lengthNorm(t.field in d)= 1/sqrt(numTerms)

Normalization value of a field, given the number of terms
within the field. This value is computed during indexing and
stored in the index. This factor returns a higher score when
a term matched in fields with less terms


Ranking of the search results are based on the score value of the result. Documents which have high score value have high rank and documents which have low score value have low rank.

Did You Mean Feature for a Search Application

This article describes how the suggesting word feature is used for a Searching application which uses Lucene.Net for indexing and searching.
Suggesting word feature is mainly useful when a user input some misspelled words and to suggest the correct word to the user.

To implement the Did You Mean feature by suggesting words, n-gram method is used. n-gram method divides the given misspelled word into sub words by considering the length of the word.
The idea behind with the n-gram method for suggesting word feature is that the misspelling occurs due to mainly one or two letters. Therefore it will only affects few n-grams. Therefore we can recognize the correct word by taking the word which share high proportion of n-grams with the misspelled word.

n-grams are created considering the length of the word.
If the word length greater than five, two grams are created having the length of three and four.
If the word length is five, then the length of the grams are two and three.
If the word length is less than five, then the length of the grams are one and two.

If we consider the misspelled word "university", then the n-gram query is like
start 3: uni^2.0 end:ity gram 3:uni gram 3:niv gram 3:ive gram 3: ves gram 3:esi gram 3:sit gram 3:ity start 4:univ^2.0 end 4:sity gram 4:univ gram 4:nive gram 4:ives gram 4:vesi gram 4:esit gram 4:sity

We index the start and end n-grams seperately because they are positional unlike other n-grams.
For example the words "eat" and "ate" have the same set of n-grams.

Also we use two set of n-grams to increase the accuracy of the suggestions. For example lets consider that words "ball" and "belt" are in the index file and no "bell" word.

Then since the word length is less than five , 1-gram and 2-gram are created.

For the word "ball" grams are
1- gram = b a l l
2-gram = ba al ll

For the word "belt"
1-gram = b e l t
2-gram = be el lt

For the searching word "bell"
1-gram = b e l l
2-gram = be el ll

By considering those 1-gram and 2-grams, we can see that number of grams matching in 1-gram is same. But it is different in the 2-gram. Therefore by taking two grams we can select the closest word.

C# code for the implementation is shown below. For the implementation two classes and one interface is used.

DidYouMeanParser interface is shown below.

using System;
using System.Collections.Generic;
using System.Text;
using Lucene.Net.Search;

///
/// DidYouMeanParser interface
///

namespace Indexer
{
public interface DidYouMeanParser
{
Query parse(string queryString);
Query suggest(string queryString);
}
}


The implementation of
DidYouMeanParser interface is done by the DidYouMeanParserClass as shown below.

using System;
using System.Collections.Generic;
using System.Text;
using
Lucene.Net.Index;
using
Lucene.Net.QueryParsers;
using
Lucene.Net.Search;
using
Lucene.Net.Search.Spell;
using
Lucene.Net.Store;


///
/// Class implement the DidYouMeanParser interface
///

namespace Indexer.DidYouMean
{
public class DidYouMeanParserClass : DidYouMeanParser
{

private string defaultField;
private string spellIndexDirectory;

public DidYouMeanParserClass(string defaultField, string spellIndexDirectory)
{
this.defaultField = defaultField;
this.spellIndexDirectory = spellIndexDirectory;
}

public Query parse(string queryString)
{
return new TermQuery(new Term(defaultField, queryString));
}

public Query suggest(string queryString)
{
try
{
SpellChecker spellChecker = new SpellChecker(spellIndexDirectory);
if (spellChecker.Exist(queryString))
{
return null;
}
string[] similarWords = spellChecker.SuggestSimilar(queryString, 1);
if (similarWords.Length == 0)
{
return null;
}
return new TermQuery(new Term(defaultField, similarWords[0]));
}
catch (Exception e)
{
throw new ParseException(e.Message);
}
}
}

}


To compare the misspelled word we use the words in the in index file. For that we create a temporary index file which having the n-grams as fields using the existing index file.
To create that DidYouMeanIndexer class is used as shown below.

using System;
using System.Collections.Generic;
using System.Text;
using Lucene.Net.Index;
using
Lucene.Net.Search;
using
Lucene.Net.Search.Spell;

///
/// Class use to create the temperorary index file for DidYouMeanParser
///

namespace Indexer
{
public class DidYouMeanIndexer
{

public void createSpellIndex(string field,
string originalIndexDirectory,
string spellIndexDirectory)
{

IndexReader indexReader = null;
try
{
indexReader = IndexReader.Open(originalIndexDirectory);
Dictionary dictionary = new LuceneDictionary(indexReader, field);
SpellChecker spellChecker = new SpellChecker(spellIndexDirectory);
spellChecker.IndexDictionary(dictionary);
}
finally
{
if (indexReader != null)
{
indexReader.Close();
}
}
}

}
}


After that we can provide the Did You mean feature by passing the misspelled words to the DidYouMeanParser class.


Integrate SQL Server Reports with MS CRM

To integrate SQL Server Reports with MS CRM, select "Reports" under MS CRM "Workplace" as shown below.


Then click on "New" to add a new report as shown in below figure.


After that click on "Browse" button which is shown in below figure, and select the report to be added. Enter the details of the report like Name, Description,etc.


Finally click the Save button to save the report. After that the added report is displayed under Reports in MS CRM Workplace.

Unable to edit my information using “My Settings” link in the SharePoint Site

We can find two links at the top of the SharePoint site as "My Settings" and "My Site". But I was unable to edit my information using "My Settings" link. Also when I clicked on "My Site" link it displayed an error message saying that cannot create a site because site is already created. Other users also had those two problems

I was able to solve those two problems by changing the "My Site Settings" from SharePoint 3.0 Central Administration. User Name in "My Site Settings" was changed to the Domain Users as shown in the below figure.


By changing User Name to Domain Users, it allows every user in the domain to create and maintain for him or her and maintaining his or her own profile. My Site Settings is appearing in the created Shared Service page

Creating a Sample Custom Web Part for SharePoint

We have to create custom web parts for SharePoint sites according to our requirements. Because web parts required for a site may not available in the Web Part Gallery of the SharePoint.
I created a simple web part which displays who the current user is logged in to SharePoint. To create and use it in SharePoint site below steps were used.

• Created a Class Library project in Microsoft Visual Studio 2005
• Then the below code is added to get the current user and show it

public class SimpleWebPart : WebPart
{
private string displayText = "Hello World!";

[WebBrowsable(true), Personalizable(true)]
public string DisplayText
{
get { return displayText; }
set { displayText = value; }
}

protected override void Render(System.Web.UI.HtmlTextWriter writer)
{
writer.Write(displayText);
}
}

• Assembly.cs file in the class library project was modified by adding below code
[assembly: AllowPartiallyTrustedCallers()]


• Then gave a strong name to the assembly by selecting project properties and then selected “Signing” tab as shown in below figure.


• Found the public key token of the Assembly by using a Reflector tool. To find the public key token of the assembly, drag and drop the compiled assembly in to the reflector. Then it shows the public key token of the assembly as shown in below figure.


• Then I located the dll file in the bin folder. The MOSS 2007 creates every portal in the inetpub\wwwroot\wss folder. The easiest way to find the bin folder from these folder hierarchies is to go from inetmgr console. Locate the appropriate portal (for which u want to deploy the web part), identified with the port number. Right click and have Properties. Under the Home Directory Tab, note the path in Local path text box as shown in below figure.


• Right clicked on the project name in the VS.Net 2005 IDE and clicked properties. Under the Build page paste the same path copied from inetmgr console into the Output Path as shown in below figure.


• Then created a new SafeControls entry for the created web part assembly by modifying the web.config file in the bin folder. The code is given below.

<SafeControls>
.
.

.
<SafeControl Assembly="NewWebPart" Namespace="NewWebPart" TypeName="*" Safe="True" / SafeControls>

• To add the created web part to the web part gallery of the SharePoint site first clicked on the “Site Actions” button and then select Site Settings as shown in
below figure


• On the “Site Settings” page under Galleries column clicked on the “Web Parts” as shown in
below figure.


• On the “Web Part Gallery” Page clicked on the “New” button, to add the new web part assembly to the gallery as shown in
below figure.


• On the “New Web Parts” page locate the created web part is in the list, checked the check box on the left and clicked on the “Populate Gallery” button the top of the page as shown in
below figure.


• Then we can add the created web part to a web part zone.

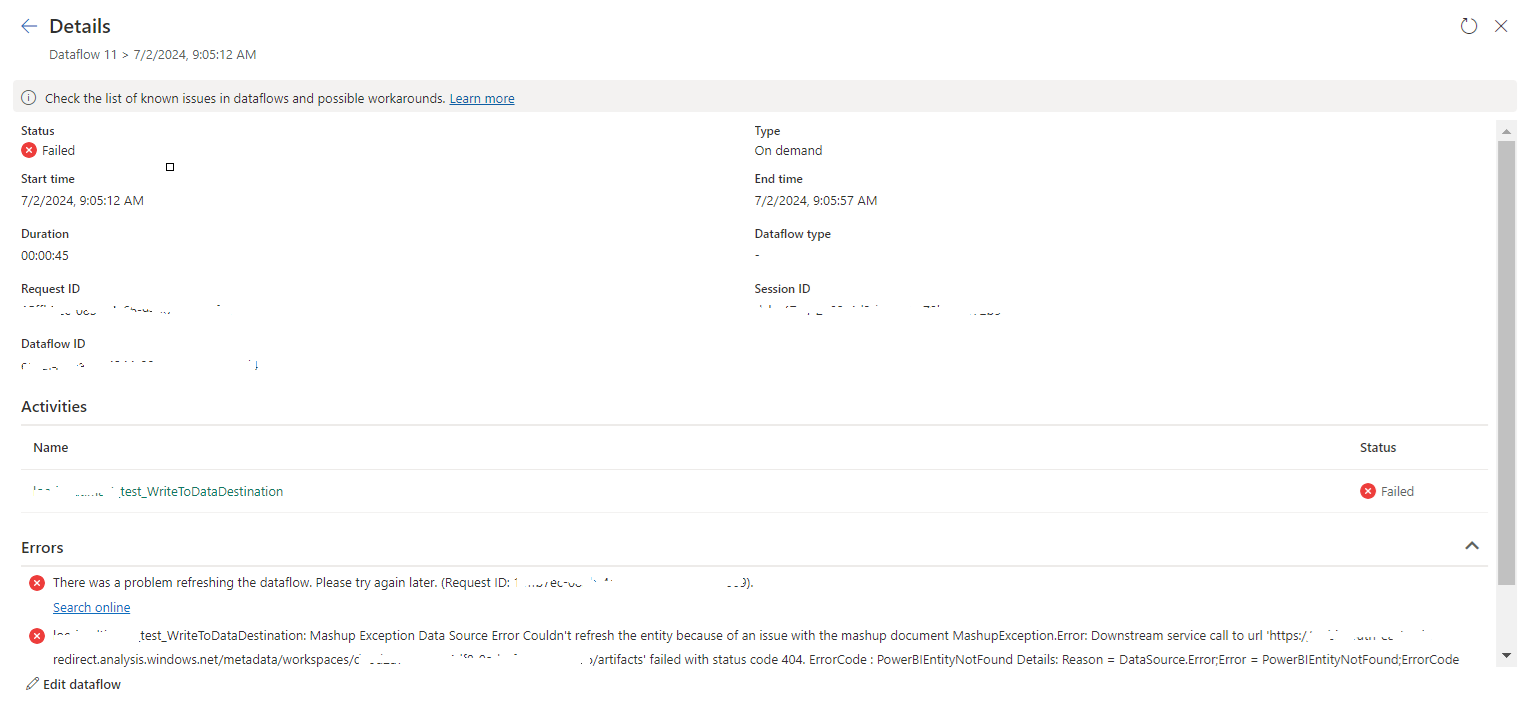
tablename_WriteToDataDestination: Mashup Exception Data Source Error Couldn't refresh the entity...

 Once a Dataflow is created and published on Fabric, got the below error while refreshing the Dataflow. tablename_ WriteToDataDestination: M...