Use of UrlRoot property in SQL Report Server Config file...

In SQL Report Subscription, you may want to send the report with the link and you can do it by selecting Include Link value. But some times you will get the link include the computer name and not the domain name. Due to that the given is not working if you try to it from outside.


This happens since you have not set the value for the UrlRoot property in the rsreportserver.config file.
To fix it, open the rsreportserver.config file in a text editor and find the UrlRoot property.
Set the value for it as the report server URL with the domain name as below.
https://server.domain.com/reportserver

That is it and you will get the link with the given domain name.

Allow E-mail address to be changed for the Users having Browser permission in SSRS Subscriptions...

Normally Users having Browser permission cannot changed the e-mail address (To: field) in the report subscription page. Default the user name is applied as the value for the To: field.
To allow this to be modifiable by users having Browser permission, you need to modify the rsreportserver.config file.

Open the rsreportserver.config in a text editor.
Then set the SendEmailToUserAlias to False and Save the rsreportserver.config file.

That is it.
Now just try to create a New Subscription and you will see there is no value in the To: field and it is editable.

Configuring SSRS Report Subscription using Gmail as the SMTP Server...

Recently I was trying to configure SSRS Report subscription. I checked some links in the MSDN and by following those steps I was unable to configure it. The reason was I used the SMTP server as smtp.gmail.com since we are not having a local smtp server. To use the smtp.gmail.com as the smtp server we need to follow some additional steps other than the steps mentioned here.

The first step is we need to configure a Virtual SMTP server.
First make sure that the SMTP Feature is installed on your server, if not installed it.
Then use IIS Manager to configure the virtual SMTP server. I am using Windows Server 2008 and it has both the IIS 6 and IIS 7.
To configure virtual SMTP server we have to use IIS 6.
Open the IIS 6.0 Manager and you will get a screen as below.


In that if the SMTP Virtual Server is not started, then start it. Then right click on it and select Properties.
You will get a screen as given below.


In the General tab select the IP Address value and unmarked the Limit Number of Connections to field.
Then go to the Access tab and click on the Relay button at the bottom. Then select All except the list below and click OK.
Then go to the Delivery tab you will get a screen as below.
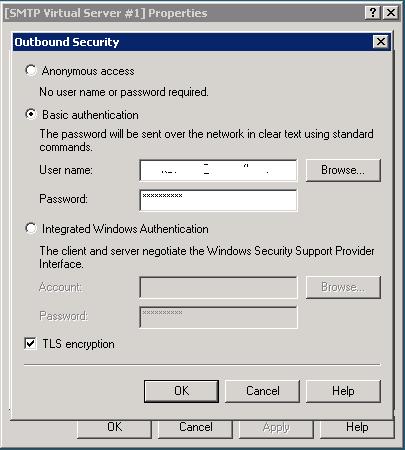


Click on the Outbound Security... button. In that select Basic Authentication and provide the gmail user name and the password as shown below. Also select the TLS encryption as well.


Click OK and then click on the Outbound connections... button.
In that change the TCP port value to 587 and click OK.

Then click on the Advanced button in the Delivery tab. Then provide the Smart host value as smtp.gmail.com and also check whether the Fully-qualified domain name is correct.
Then click OK on both the Advanced Delivery window and the Properties windows. That is it and now you completed configuring virtual SMTP server.

The next step is to use that virtual SMTP server to configure Reporting Services.
To configure it run the Reporting Service Configuration Manager. Connect to the Reporting Service instance and select Email Settings. You will get a screen as shown below.


In that provide the Sender Address which is used to send mails. For the SMTP Server value, provide the IP Address given for the virtual SMTP Server. Click Apply.

But still it is not completed. You have to modify the rsreportserver.config file which can be found at  C:\Program Files\Microsoft SQL Server\MSRS10_50.MSSQLSERVER\Reporting Services\ReportServer.

The rsreportserver.config contains a property as SendUsing which specify whether a local SMTP Server (SendUsing =1) is used or a Remote SMTP server (SendUsing =2) is used to send mails.
Since we are using virtual SMTP server we need to set the value as 1.

The other property we need to set is SMTPServerPickupDirectory value which specifies the local pickup directory. We need to set that value in the rsreportserver.config file as well and for my example it is as C:\inetpub\mailroot\Pickup. Then save the rsreportserver.config file.

You will complete the configuring Reporting Service E-mail Delivery after saving the rsreportserver.config file. That is it.

Now go to the Report Server and click the down arrow of the relevant report and select Manage. In that select Subscriptions and create a New Subscription. In that page select the report delivery option as E-mail and provide other required values. 

After that you will get e-mails according to the given schedule.

How to get the installed SQL Server details...

We can get the installed SQL Server details such as SQL Server Edition, Product Version and Product Level using the below query. Just open a query window using SQL Server Management Studio and run it.

   1: SELECT SERVERPROPERTY ('edition') AS SQLEdition,SERVERPROPERTY ('productversion') AS ProductVersion, SERVERPROPERTY ('productlevel') AS ProductLevel

Passing Parameter value for a rdlc report in ASP.Net and Windows Forms......

In most of the times we need to filter report data. Recently I had a requirement to create a rdlc report and add it to an ASP.Net page. In that I need to filter data using the name.

In ASP.Net and Windows forms, creating data set and reports parts are same. The different is passing the parameter value from the code.

In ASP.Net, steps used are

  • Create a Data Set by right click on the project and select Add → New Item
  • Then select Data → DataSet
  • When the DataSet is added to the solution, right click on the DataSet Designer and select Add→TableAdapter.
  • In that you need to provide the query to retrieve data and in this example I assume it as SELECT Name, Address, ContactNo FROM Users WHERE (Name LIKE @name + '%')
  • @name is the parameter which we need to pass.
  • Then add a new report and select the DataSet as the one which we created earlier.
  • Then add a ReportViewer component and select the Report as the one created earlier.
These steps are common for the Windows Forms as well. But next steps are different in ASP.Net and Windows Forms.

In ASP.Net
  • When the report is added to the report viewer, ObjectDataSource is automatically added. You need to configure it to pass the parameter.
  • Click on the arrow in the ObjectDataSource and select Configure Data Source. In the wizard you will get a step to define parameters as shown in the below figure.

  • Provide the required details as shown in the figure and click on Finish.
  • Then go to aspx.cs file and add the below code in the View button click event. Here View button is used to view the report by passing parameters. To enter parameter value a TextBox is used.

    protected void btnView_Click(object sender, EventArgs e)
        {
            string name = txtName.Text;

            ObjectDataSource1.SelectParameters["name"].DefaultValue = name;
            ObjectDataSource1.DataBind();
            this.ReportViewer1.LocalReport.Refresh();
        }

  • Then when you click the View button, the value provided in the text box is passed as the parameter value and report data is filtered for it.
In Windows Forms
  • When the report is added to the report viewer, TableAdapter is automatically added.
  • You can pass the parameter values for the table adapter. You can pass the parameter values in the View button click event as below.

    protected void btnView_Click(object sender, EventArgs e)
        {
            string name = txtName.Text;

            this.DataTable1TableAdapter.Fill(this.SampleDataSet.DataTable1, name);
            this.ReportViewer1.LocalReport.Refresh();
        }


  • When the View button is clicked, the parameter values are passed and data set is filtered according to those values.

Get Week Numbers for Quarter and Month in SQL...

I needed to get the Week Number for the Month and the Quarter for a BI Application.
I was able to retrieve it using the below query.

SELECT DATEDIFF(WEEK, DATEADD(MONTH, DATEDIFF(MONTH, 0, '2012-03-17'), 0), '2012-03-17') +1 AS WeekNoMonth,DATEDIFF(WEEK, DATEADD(QUARTER, DATEDIFF(QUARTER, 0, '2012-03-17'), 0), '2012-03-17') +1 AS WeekNoQuarter

The results are WeekNoMonth=3 and WeekNoQuarter=11

How to run UPDATE/INSERT/DELETE Statements on Azure SQL Database in Microsoft Fabric Notebook...

You can run UPDATE/INSERT/DELETE Statements on Azure SQL Database in Microsoft Fabric Notebook using Python SQL Driver - pyodbc.  For the Fa...